Short answer
Read Repair Class on the equipment tooltip, then choose the matching gun kit or armor kit. A blueprint must be crafted into a kit first. Under 0.7.0, class-specific kits have no damage-level restriction; general maintenance items still have their own condition thresholds. Clearing a jam does not restore condition.
Which weapon repair kit do I need?
Matrinn · September 20 guide Match the tooltip's class, not the weapon's price or appearance. These are reported shop requirements, not a live inventory feed. Blueprint prices below are not finished-kit prices; confirm the current quote before buying.
| Repair Class | Blueprint access / reported price | Finished-kit lead |
|---|---|---|
| Scrap | Starting recipe; no blueprint purchase | Grigory or Anatoly, Rank 1 |
| Basic | Grigory, Rank 1 / 30,000 Rubles | Craft; no seller identified by this guide |
| Advanced | Volodymyr, Rank 2 / 40,000 Rubles | Volodymyr, Rank 2 |
| Expert | Volodymyr, Rank 3 / 60,000 Rubles | Volodymyr, Rank 3 |
Missing a component? Basic-kit Mechanical Components are reported at Petar or Nadja, Rank 1. Advanced Mechanical Components for the higher kits are reported at Nadja, Rank 3. These are sourcing leads, not the complete crafting recipe: read quantities and other ingredients at the bench.
Source: Matrinn — A Basic Weapon Repair Guide; September 20, 2026, with recipe screenshots ↗
Which armor kit and blueprint should I look for?
Matrinn · September 20 guide Read the armor's Repair Class before travelling. Tattered, Scavenger, Medium and Heavy are separate kit categories.
| Repair Class | Blueprint access / reported price | Finished-kit lead |
|---|---|---|
| Tattered | Starting recipe; no blueprint purchase | Vesna, Yelena or Anatoly, Rank 1 |
| Scavenger | Vesna, Rank 1 / 30,000 Rubles | Craft; no seller identified by this guide |
| Medium | Yefim, Rank 2 / 50,000 Rubles | Yefim, Rank 2 |
| Heavy | Yefim, Rank 3 / 75,000 Rubles | Yefim, Rank 3 |
Missing armor materials? The same guide lists Kevlar Weave at Nadja, Rank 2, and Armor Plate at Nadja, Rank 3. Check the recipe's full ingredient list before spending. Use the repair-supply location leads to find Yefim and Sontse Station.
Source: Matrinn — A Basic Armor Repair Guide; September 20, 2026, with recipe screenshots ↗
Recipe unlocked, but no usable kit? Open the correct crafting interaction, compare required ingredients with your supplies, craft, then inspect the resulting item in Inventory. Follow its use prompt and compare the equipment's condition before and after. If the kit still will not apply, check class and condition separately below.
Repair action unavailable: start here
Still buying supplies? Use the Basic gun kit route or Medium armor buy-or-craft route first.
Use this branch when you already have a maintenance item but cannot apply it. If you are trying to craft one instead, jump to the workbench menu checks.
Editorial troubleshooting flow, not an in-game interface.
- 1 / IdentifyRead the exact equipment and repair-item names. Keep a jam separate from a disabled repair action.
- 2 / CompareCompare your game version and item condition with the dated repair table below.
- 3 / InspectRead the item's current requirements and any displayed reason the action is unavailable.
- 4 / VerifyAfter using a tool, inspect condition again. If it fails, capture the item, prompt and build for Feedback.
Match your item to its rule
| Item | Condition rule in 0.7.0 | Do not confuse with |
|---|---|---|
| Gun / Armor Repair Kits | No damage-level restriction in the patch note | A promise that any kit fits any item |
| Glue / Gun Lube | 80% durability use threshold | The amount restored |
| Cleaning Rods / Field Repair Kits | 70% durability use threshold | A guaranteed final condition of 70% |
Gun and Armor Repair Kits now work regardless of damage level. Glue and Gun Lube can be used from 80% durability; Cleaning Rods and Field Repair Kits from 70%. Match the item name before applying these conditions.
Read the current item prompt, use the matching tool, then check the result. Do not apply an older guide's condition cutoff to every repair item.
The two September 20 community guides suggest switching to general maintenance at 60%. That is not a universal threshold: the official note above gives different rules for named items. For Sewing Kits or Gun Field Tools, read their own tooltip; do not borrow the value for a similarly named item.
Source: Official 0.7.0 repair changes — checked September 16 ↗
Volodymyr missing the newly listed kits? A September 16 player confirmed that sleeping and reopening his trade window made them appear. See the stock-refresh case before assuming you need a different vendor.
Check the repair in three stages
- Before use: compare the exact pair.Read the gun or armor name, its condition and the maintenance item description. A blueprint or recipe is not a usable repair kit.
- At use: follow the available item action.Check any displayed compatibility or condition message. The patch's 80% and 70% wording does not specify exact boundary behavior; follow the current prompt instead of spending a valuable item to guess it.
- After use: inspect the same equipment.Compare condition and maintenance-item quantity or charges. A closed menu, a crafted kit or a cleared jam alone is not a successful repair.
For a missing kit, Volodymyr and Yefim's named kit listings are a starting point. These are source-informed checks; no before/after gameplay capture or exact restored amount is claimed.
How to tell it worked
The equipment's displayed condition increases after the maintenance action. Crafting a kit alone does not confirm that you have repaired the gun.
If it still fails
Stop repeating the same use attempt. Capture the equipment name, condition, maintenance item and disabled prompt. If the recipe itself is missing, use the workbench checks; if the item still cannot be applied, include those details and your build in Feedback.
At the bench, but seeing the wrong menu?
Choose the correct side of the workbench
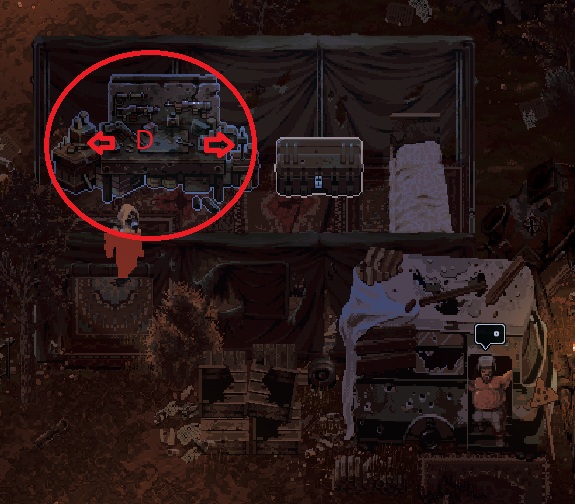
Find the circled bench, then read its interaction label before opening a menu.
- Look for this
- The author's red arrows mark two sides: left for weapon attachments, right for crafting maintenance items.
- Before moving on
- The menu matches your task: attachment slots for modifying a weapon, or recipe ingredients for crafting.
- If it does not match
- Close the wrong menu and check the other interaction. A missing recipe needs its own blueprint and material checks; changing attachments does not repair condition.
Player-confirmed workaround · September 11 In the room beside Grigory, point at the right half of the weapon workbench for crafting; the left half opens weapon modification. Two players explained this to someone who could only find attachments, and the original poster acknowledged the solution. Confirm the interaction label, open the recipe, then check its blueprint and materials. The existing annotated image shows the two sides, not the subsequent repair action.
Source: Weapon-repair crafting question — two replies and original-poster confirmation ↗
For a missing recipe, inspect what your current traders offer and any displayed unlock requirement. Do not substitute an old guide's trader price or rank for the requirement shown in your game.
For example, a guide that says “all repairs need the same condition” is not enough to diagnose a failed action. Note whether you are holding a Gun Repair Kit or a Cleaning Rod, then use the corresponding row above. Do not use an expensive item merely to test a guessed rule.
How to tell it worked
The menu shows the intended maintenance recipe and its requirements, rather than weapon attachment slots. If you craft the item, confirm that it appears in your inventory.
If it still fails
Record which station and menu you opened, the recipe name and any unlock or material requirement shown. A station screenshot does not prove that a particular recipe is unlocked in your save.
Two repair shopping routes: craft a gun kit or buy armor supplies
Basic gun repair: the blueprint is not a usable kit
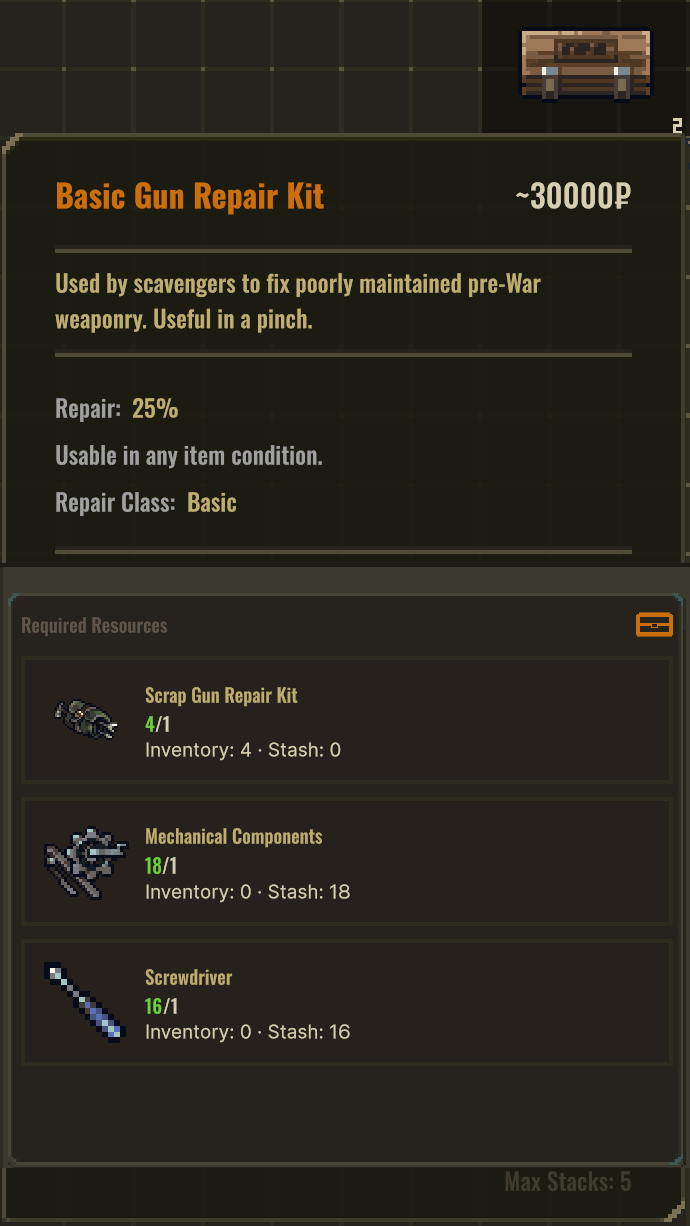
Screenshot recipe: 1 Scrap Gun Repair Kit + 1 Mechanical Components + 1 Screwdriver. This is the displayed recipe in Matrinn's 0.7.2 reference, not a guarantee that a later build has identical ingredients. Check your bench before spending.
Read the Basic Gun Repair Kit recipe
At the crafting interaction, select Basic Gun Repair Kit and compare the ingredient rows.
- Look for this
- One Scrap Gun Repair Kit, one Mechanical Components and one Screwdriver. In 18/1, the required quantity is the 1 after the slash.
- Before moving on
- All required resources are available and the finished kit appears after crafting. Applying that kit to the matching weapon is a separate step.
- If it does not match
- If you see attachment slots, change workbench interaction. If the recipe differs, follow your installed build rather than forcing this 0.7.2 example.
Matrinn guide rechecked September 27 · 0.7.2 reference For a weapon whose tooltip says Basic, the guide points to Grigory at The Mire, Rank 1, for a 30,000-Ruble blueprint. It lists no finished Basic-kit seller. Mechanical Components are a separate purchase from Petar or Nadja at Rank 1; the blueprint price is not the total crafting cost.
- Read the weapon tooltip before buying.Confirm Basic Repair Class. Do not choose a blueprint merely because the weapon looks like an upgrade.
- Open crafting, not weapon modification.Use the right-side workbench interaction. Select Basic Gun Repair Kit, then compare all three ingredient rows with the screenshot. The numbers before the slash describe available supplies; the numbers after it are required amounts.
- Craft, inspect, then apply.Confirm that a finished kit appears in Inventory. Follow its use prompt on the matching weapon and compare durability before and after; a learned recipe alone cannot repair it.
Source: Basic Gun Repair Kit section — recipe and component access, not an independently reproduced repair ↗
Medium armor repair: buy a kit or craft one?
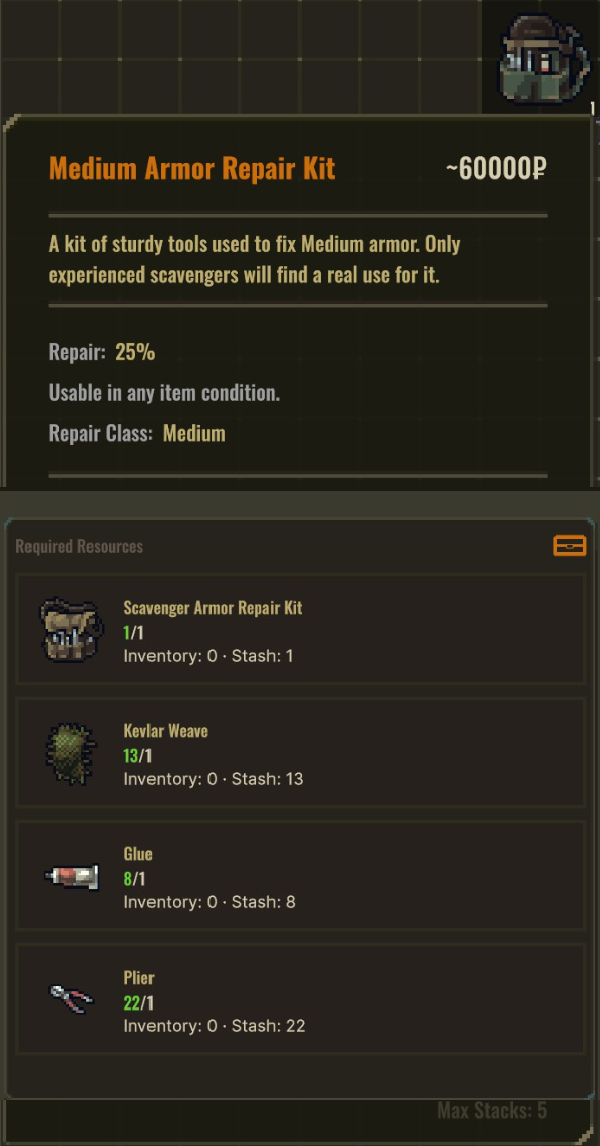
Screenshot recipe: 1 Scavenger Armor Repair Kit + 1 Kevlar Weave + 1 Glue + 1 Plier. Do not substitute a gun kit for the Scavenger armor kit. The picture's 13/1 Kevlar and 22/1 Plier rows each require one, not thirteen or twenty-two.
Match the Medium armor kit and ingredients
Check the armor's Repair Class, then compare this Medium kit recipe at the appropriate crafting station.
- Look for this
- One Scavenger Armor Repair Kit, one Kevlar Weave, one Glue and one Plier. This is a recipe reference, not today's merchant price.
- Before moving on
- You have a finished Medium kit, not only its blueprint. After using it, check the same armor's condition to confirm the result.
- If it does not match
- A gun kit is not the pictured armor ingredient. If crafting works but use does not, check the armor class and displayed use prompt; do not repeatedly spend supplies.
For Medium Repair Class, Matrinn lists both a finished kit and its blueprint at Yefim, Rank 2, east of Sontse Station. The reported 50,000 Rubles is the blueprint price, not a finished-kit quote. The crafting route also needs Kevlar Weave, listed at Nadja, Rank 2.
| Route | Check in your game | What proves progress? |
|---|---|---|
| Buy a finished Medium kit | Yefim's current stock, Rank 2 access and actual kit price | A usable kit in Inventory, not a blueprint |
| Buy the blueprint and craft | Recipe unlock, tailoring-station ingredients and quantities, including Kevlar Weave | The crafted kit appears; then confirm condition changes on matching armor |
If the recipe is absent, check the blueprint and station; if crafting is disabled, check ingredients; if use is disabled, check the resulting item and armor class. Recipe quantities above were read from the cited screenshots; a continuous before/after repair sequence is not verified here. Both pictured kit tooltips say Repair: 25% and allow use at any item condition. This is a tooltip claim, not our measured repair result. Do not assume one kit restores every item fully.
My crafting screen does not match the screenshot
| What you see | What to check next |
|---|---|
| Attachments instead of recipe ingredients | Check the weapon bench's interaction label; the left and right sides open different menus. |
| One required resource is missing | Compare the exact item name and quantity after the slash. A higher-tier kit or a similarly named material is not shown as a substitute. |
| Supplies are in another camp | The screenshot proves access to that player's listed Stash, not every camp. Check separate camp storage before buying duplicates. |
| The kit crafted but condition stayed the same | Crafting only creates an item. Apply the matching kit using its available prompt, then compare the same equipment's condition. |
| Your recipe has different ingredients | Use the requirements shown by your installed build. Record the version; these screenshots document the source guide's 0.7.2 reference. |
Source: Medium Armor Repair Kit section — community shopping and crafting leads ↗
Repair Class: a photographed Heavy armor example
Player screenshots · September 16 and 18 Sir Robin posted Ekzoskelet Armor in a bunker crate, then a later inventory image described as repaired. Compare the tooltip fields below and open the original screenshots to inspect them. Both show Repair Class: Heavy; this is more useful for matching a kit than judging the armor by its appearance.
| Field | Earlier screenshot ↗ | Later screenshot ↗ |
|---|---|---|
| Durability | 19 | 99 |
| Ballistic Res / Slash Res | 10 / 10 | 50 / 50 |
| Rad Res | 6 | 30 |
| Repair Class | Heavy | Heavy |
The tooltips do not display percent signs for these numbers. The pair shows two item states, not a continuous repair sequence or proof that the same individual item was used. It does not establish the kit count, cost, key press or a 99-point maximum. The player's Rank 3 comment was tentative; the later Matrinn guide explicitly reports Rank 3. That adds community corroboration, not an independently tested unlock.
Source: Sir Robin's item-find and repaired-armor follow-ups; screenshots inspected September 19 ↗
A jam is not the same as a repair problem
If a weapon stops firing, first read the current prompt and check ammunition. If the game identifies a jam, use its displayed action for your input device. If a repair action is disabled, follow the item-and-condition checks above instead. These are separate diagnoses; neither proves your save is broken.
Input report · September 10 Arkan reports that unjamming and reloading shared a button, and repeated input could start a lengthy reload after clearing the jam. This supports checking your reload binding and waiting for the current action before pressing again. It does not establish a universal double-tap-R command or confirm the same mapping on every current controller layout.
Source: Weapon jamming — reported reload/unjam overlap; no developer reply ↗
The 0.7.0 notes reduce hard-jam chance at 10% durability to 33%. That single balance point is not the probability for every condition level, and clearing a jam is not evidence that durability has been restored.
How to tell it worked
The game no longer shows the same jam prompt and the weapon responds to its firing controls when used normally. Check condition separately; a cleared jam is not a repair.
If it still fails
Do not assume every failure to fire is a jam. Capture the displayed prompt, loaded ammunition, weapon condition and your input binding. No universal clear-jam key is verified here.
Patch history and older durability rules
Earlier durability reference
The official store describes weapons that can jam and a repair / maintenance system. Update 0.5.169 adds a sharper safety boundary: guns can now explode below 30% durability instead of 50%. That is an explosion threshold, not proof of a separate jam threshold.
Source: Scavland Steam store page ↗
Source: Scavland Day One Patch — Update 0.5.169 ↗
Repair changes in Update 0.6.0
Volodymyr's Advanced Weapon Repair Kit recipe unlocks at Rank 2. Workbenches can draw materials from your Stash, and Repair Kits stack to five. Gun Cleaning Rods require Gun Lube in this update; do not confuse the crafting recipe with the condition rule for applying a maintenance item.
The update also fixes rounded durability values that made destroyed equipment appear repairable. Check the actual item state and recipe requirements when a repair is unavailable. For equipment selection, see weapons and loadouts; for vendor progression, see traders and contracts.
Source: Update 0.6.0 — items, traders and durability fixes; checked September 13 ↗
Weapon repair FAQ
What durability is dangerous for a Scavland gun?
The Day One patch says guns can explode below 30% durability. That is the official explosion boundary; this page does not turn it into a universal jam threshold.
How do I clear a weapon jam?
Follow the current on-screen reload or jam prompt for your input device. The cited official notes do not publish one universal keybind, so a precise key claim needs a current in-game check.
Why can I not repair a particular gun?
Identify the exact maintenance item and compare its condition rule with your build. If you are crafting instead of applying an item, check the workbench interaction and recipe requirements. Record the disabled prompt if those checks do not explain it.